Use our grout mixing guide for perfect tile joints. Learn exact ratios, slake times, and tips to prevent color shading and avoid common installation failures today.
Table of Contents
- Quick Summary
- Quick Stats: Grout Mixing
- Introduction
- Understanding Powder-to-Water Ratios
- The Importance of Slake Time
- Batching and Working Time Limits
- Troubleshooting Grout Mixing Mistakes
- What People Are Asking
- Comparing Grout Types
- Practical Tips
- Final Thoughts on Grout Mixing
- Further Reading
Quick Summary

A grout mixing guide provides a systematic approach to combining cementitious powder and water for tile installations. Proper technique ensures consistent color, structural integrity, and long-lasting performance by strictly adhering to manufacturer ratios, slake periods, and batch size limitations.
Quick Stats: Grout Mixing
- Incorrect mixing accounts for 80 percent of grout failures (Ceramic Tile Education Foundation, 2024)[1].
- Over-watering is cited by 62 percent of installers as the top cause of color shading (TileLetter, 2024)[2].
- Adding 25 percent excess water can cause a 33 percent loss in compressive strength (Custom Building Products, 2024)[3].
- Professional batches should be limited to a 30-minute maximum working time (MAPEI, 2024)[4].
Introduction
Following a reliable grout mixing guide forms the foundation of any successful tile installation. While selecting beautiful tiles often captures the most attention, the material filling the joints dictates the longevity and visual uniformity of the entire project. Many DIY enthusiasts and even some professionals underestimate the chemical reactions required to cure cementitious compounds properly. When water ratios are guessed or slake periods are skipped, the result is often weak, discolored joints that crumble over time. This comprehensive overview breaks down the essential steps for achieving a flawless finish. We will explore exact powder-to-water measurements, the critical resting phase, batch management, and how to avoid the most frequent jobsite errors. By mastering these techniques, you ensure your tile work remains durable and visually appealing for decades.
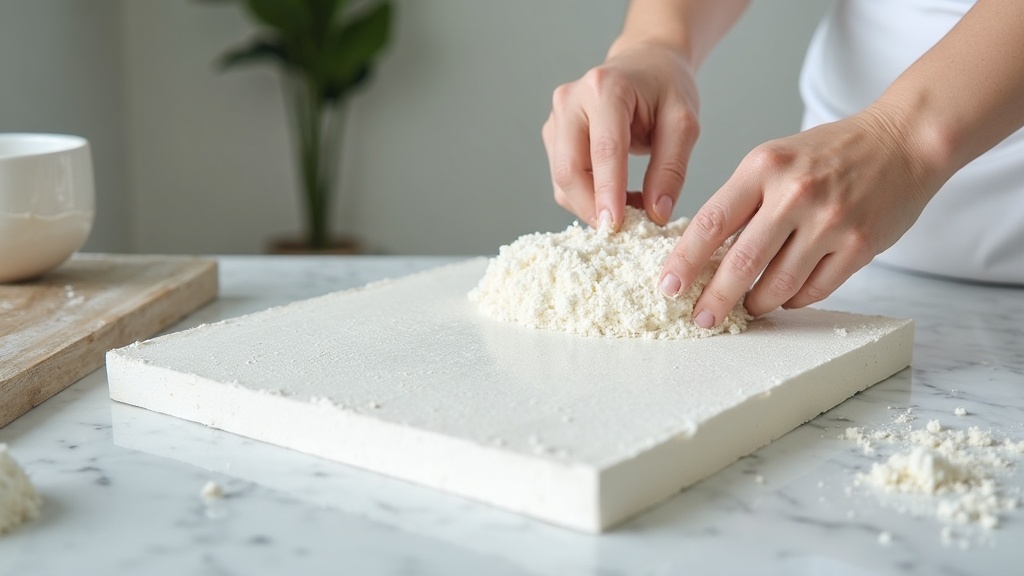
Understanding Powder-to-Water Ratios
Precise measurement of ingredients is the most critical step when following any grout mixing guide. Cementitious products rely on a specific chemical hydration process to achieve their designed compressive strength and stain resistance. Guessing the amounts or using volume measurements like cups often leads to inconsistent batches. Travis Jacobs, Director of Technical Services at MAPEI Corporation, emphasizes this precision: “Always follow the powder-to-water ratio on the grout’s technical data sheet and measure both components accurately if you want consistent color and performance from batch to batch” (MAPEI, 2024)[4].
Manufacturers specify exact water demands to optimize the polymer modifiers and pigments within the dry blend. For instance, technical documentation indicates a water demand of approximately 0.29 to 0.32 liters of water per kilogram of grout powder, depending on the specific product formulation (MAPEI, 2024)[4]. Deviating from this narrow window compromises the final cure. When installers add too much liquid to make the mixture easier to spread, they inadvertently dilute the polymers. Laboratory testing shows that grout mixed with 25 percent more water than specified can lose up to 33 percent of its compressive strength (Custom Building Products, 2024)[3].
To maintain the specified mix ratio within an allowable variation of just 2 percent, professionals recommend weighing both the powder and the water on a digital scale rather than relying on volume measures (MAPEI, 2024)[4]. This is especially crucial when mixing partial units. If a project only requires half a bag, weighing the dry material and calculating the exact corresponding liquid weight prevents the color shading and structural weaknesses associated with imprecise splitting. Using a clean bucket and a low-speed drill with a specialized mixing paddle ensures the dry powder is fully wetted out without whipping excess air into the slurry. For foundational knowledge on ceramic tile standards, consult the Ceramic Tile Education Foundation.
The Importance of Slake Time
Understanding the resting phase is a core grout mixing principle that separates amateurs from professionals. Slaking is a mandatory resting period that allows the chemical components to fully activate before installation. After the initial mechanical blending, the mixture must sit undisturbed. Mark Pennine, Technical Services Manager at Custom Building Products, explains the ideal process: “When mixing cementitious grout, aim for a workable, creamy consistency similar to peanut butter and then let it slake before a brief remix to fully wet the pigments and polymers” (Custom Building Products, 2024)[3].
During this resting phase, the dry particles absorb the moisture completely, and the polymers begin to dissolve and disperse evenly throughout the batch. Custom Building Products recommends allowing cementitious grout to slake for about 10 minutes after the initial blending (Custom Building Products, 2024)[3]. Skipping this step leaves dry pockets of powder trapped inside the wet exterior, which later manifest as weak spots or white efflorescence on the surface of the cured joints.
Once the resting period concludes, the material requires a brief secondary blending. This final remix breaks up any remaining clumps and restores the creamy texture without adding any extra liquid. It is vital to resist the urge to add more water during this stage if the mixture appears stiff. Re-tempering with additional liquid disrupts the water-to-cement ratio established during the first blend. A 2024 training review reported that premature re-tempering with additional water is observed on approximately 25 percent of inspected residential tile jobs, leading to severe performance degradation (TileLetter, 2024)[2]. Proper slaking eliminates the need for re-tempering by ensuring complete hydration from the start.
Batching and Working Time Limits
Managing batch sizes is a vital grout mixing topic that prevents material waste and poor joint quality. Cementitious compounds begin to set as soon as water is introduced, meaning the clock starts ticking the moment blending finishes. Following a reliable grout mixing guide ensures that professionals mix only as much material as they can place and wash within the working time specified on the bag. Small, fresh batches are far easier to manage than one large batch that starts to stiffen prematurely.
Professional guidance recommends limiting individual batches to what can be installed within roughly 30 minutes to maintain workability and performance (MAPEI, 2024)[4]. For smaller DIY tile projects, the usable pot life is often even shorter, with mixed material typically needing to be used within 15 to 20 minutes before it begins to set (Bunnings Warehouse, 2024)[6]. Attempting to mix an entire large bag at once often results in the material stiffening in the bucket before it can be forced into the tile joints.
When the material begins to stiffen in the bucket, it has reached the end of its viable working time. At this point, it must be discarded. Adding water to revive a stiffening batch, a practice known as re-tempering, severely weakens the final cure and causes surface dusting. Planning the workflow to mix smaller, manageable quantities ensures that every joint receives fresh, fully workable material. This approach also makes the crucial cleanup phase much easier, as the installer is not rushing to wash the tiles before a massive area hardens completely.
Troubleshooting Grout Mixing Mistakes
Identifying and correcting common errors ensures a professional-grade finish when applying your grout mixing techniques. The most frequent issue encountered on jobsites relates to moisture management. James Woelfel, Vice President at Artcraft Granite, Marble and Tile Co., notes that “The most common grout problem I see on jobsites is over-watering – both during mixing and cleanup – which weakens the grout and often leads to color shading and surface dusting” (TileLetter, 2024)[2].
Color shading occurs when different joints dry at different rates or contain varying amounts of water. A survey of certified tile installers found that over-watering during blending or the subsequent sponge cleanup is the single most common cause of these color inconsistencies, cited by 62 percent of professionals (TileLetter, 2024)[2]. To prevent this, installers must use a nearly dry sponge during the initial washing phase and avoid flooding the joints with clean water. Furthermore, incorrect mixing and installation account for a significant majority, roughly 80 percent, of all failures investigated in North American tile projects (Ceramic Tile Education Foundation, 2024)[1].
Proper technique is not just about appearance; getting the ratio, mixing time, and slake time right is critical for achieving the specified strength, stain resistance, and service life. When joints exhibit surface dusting or a chalky texture, it is almost always a result of excess water rising to the surface and carrying fine cement particles with it as it evaporates. Adhering strictly to the manufacturer’s grout mixing instructions prevents these structural and aesthetic defects.
What People Are Asking
Why does my grout look lighter in some areas?
Color shading is primarily caused by inconsistent moisture levels across the installation. When excess water is added to the mixture or used during the sponge cleanup phase, it dilutes the pigments in those specific joints. As the water evaporates, it carries fine cement particles to the surface, leaving a lighter, chalky appearance. Ensuring exact powder-to-water ratios and using a damp, rather than wet, sponge during cleanup will promote uniform color throughout the entire tiled area.
Can I add more water if the mixture gets too stiff?
No, adding water to a stiffening batch is a practice known as re-tempering, and it severely compromises the material. Once the chemical hydration process advances and the mixture begins to set, introducing more liquid breaks the crystalline structure forming within the joints. This results in a weak, crumbly finish that lacks compressive strength and stain resistance. If the material stiffens in your bucket before you finish the job, you must discard it and mix a fresh, smaller batch.
What is the purpose of letting the mixture rest?
The resting phase, known as slaking, allows the dry powder particles to fully absorb the water and the polymer additives to completely dissolve. If you skip this step, dry pockets of powder remain trapped inside the wet exterior, leading to weak spots and inconsistent curing. After the designated rest period, a brief secondary blending restores the creamy texture and ensures a homogenous slurry that is ready to be forced into the tile joints.
Should I use pre-mixed or dry powder products?
The choice depends on your experience level and project size. Pre-mixed products eliminate on-site blending variability and are highly convenient, representing an estimated 18 percent of consumer tile sales. However, traditional dry powder products offer superior compressive strength and are preferred for large-scale or high-moisture professional installations. Using a proven grout mixing guide ensures that if you choose dry powder, strict adherence to weighing ingredients and respecting slake times is maintained to achieve the manufacturer’s specified performance characteristics.
Comparing Grout Types
Selecting the right material is just as important as following a strict grout mixing guide for the chosen product. Different formulations offer distinct advantages depending on the environment and joint width. The table below contrasts the primary options available for modern tile installations.
| Feature | Cementitious (Sanded) | Cementitious (Unsanded) | Premixed / Acrylic |
|---|---|---|---|
| Joint Width | 1/8 inch or larger | Less than 1/8 inch | Varies by brand |
| Mixing Required | Yes (Strict ratios) | Yes (Strict ratios) | No (Ready to use) |
| Compressive Strength | Very High | High | Moderate |
| Stain Resistance | Moderate (Needs sealing) | Moderate (Needs sealing) | High |
While premixed options offer convenience, traditional cementitious powders remain the standard for demanding commercial and residential floors due to their superior structural integrity when blended correctly.
Practical Tips
Achieving professional results requires attention to detail beyond the initial blending. A comprehensive grout mixing guide requires using cool, clean potable water, as warm water accelerates the setting time and reduces your working window. Before starting, ensure your tile joints are free of dust, thinset residue, and debris, which can prevent proper adhesion and cause the material to pop out over time. For more detailed preparation steps, review our sample page of grout projects to see how professionals prep their surfaces.
When forcing the material into the joints, use a firm rubber trowel and work at a 45-degree angle to ensure the cavities are completely packed without leaving voids. After the initial set, use a margin trowel to strike the joints for a smooth, concave finish. During the haze removal phase, change your wash water frequently and wring out your sponge thoroughly to avoid flooding the fresh joints. If you are tackling a complex layout or need more inspiration, browse our uncategorized grout tutorials for additional techniques. Finally, protect the fresh installation from foot traffic and direct sunlight for at least 72 hours to allow for a complete, uninterrupted curing process.
Final Thoughts on Grout Mixing
Mastering the techniques outlined in this grout mixing guide transforms a tedious chore into a reliable process that guarantees beautiful, long-lasting tile work. By respecting exact measurements, honoring the slake period, and managing batch sizes, you eliminate the vast majority of common jobsite failures. Remember that patience and precision always yield better results than rushing through the blending phase. For more expert advice, detailed product reviews, and advanced installation strategies, continue exploring the comprehensive resources available right here on concretegrout.com.
Further Reading
- CTEF technical tips: Getting grout right. Ceramic Tile Education Foundation.
https://www.ceramictilefoundation.org/blog/getting-grout-right-technical-tips - Avoiding common grout failures in tile installations. TileLetter (National Tile Contractors Association).
https://www.tileletter.com/avoiding-common-grout-failures/ - Grout troubleshooting and best practices for installers. Custom Building Products.
https://www.custombuildingproducts.com/media/945339/en-tech-bulletin-grout-best-practices.pdf - Mixing partial units of grout. MAPEI.
https://cdnmedia.mapei.com/docs/librariesprovider10/line-technical-documentation-documents/mixing-partial-units-of-grout.pdf - Practical tips for grout mixing and placement. Tile Magazine.
https://www.tile-magazine.com/articles/91567-practical-tips-for-grout-mixing-and-placement - How to mix and apply grout. Bunnings Warehouse.
https://www.youtube.com/watch?v=ub5–rxLrtA
For more about Groutmixing guide, see Groutmixing Guide.